Can you make a 1980s laminate countertop look like something you actually want to touch without losing your security deposit when the lease ends? The answer is yes, but the product category most people reach for first contains at least three materially different things, and picking the wrong one turns a weekend project into an expensive mistake. What shows up on Instagram as a single afternoon's work and forty dollars' worth of marble-pattern film rarely includes the follow-up post six months later, when the edge near the sink has lifted and a misplaced baking sheet left a permanent scar.
The products that actually work on rental countertops fall into two buckets: countertop-grade contact paper and architectural vinyl film. Shelf liner, the thin stuff sold in dollar stores and marketed under the same "contact paper" label, is neither designed for horizontal surfaces nor thick enough to survive daily use. Its adhesive is weak and its thickness, often under 2 mils, tears during installation. Countertop-grade films start thicker and trade on two variables that matter more than the pattern you choose: heat tolerance and edge adhesion.
The gap between a social media before-and-after and a surface that survives actual cooking isn't about skill. It's about matching a material's physical limits to how you use your kitchen. And most product listings won't volunteer the one number that makes the difference.
The Two Material Grades That Actually Matter
The term "contact paper" gets applied to everything from gift-wrap-thin shelf liner to textured vinyl films approaching the thickness of a credit card. If you're reading product descriptions and every option uses the same words, look for one spec: thickness in mils or millimeters. Dan DiClerico, a home expert at HomeAdvisor, recommends veneers at least four millimeters thick for countertop use, noting that anything thinner fails to conceal bumps in the existing surface and scratches through faster.[1] Standard contact paper runs between 2 and 4 mils, roughly 0.05 to 0.1 millimeters. At that gauge, it conforms to minor texture but telegraphs deeper imperfections and shows knife marks the first time someone forgets a cutting board.
Architectural vinyl film, sold under brand names like 3M Di-Noc and Vvivid, starts around 8 mils and incorporates air-release channels in the adhesive layer, which lets you reposition during installation instead of committing to every placement error. The cost difference is real: contact paper runs $15 to $30 per roll, while architectural vinyl typically costs two to three times that. But the failure mode for thin film isn't a small cosmetic flaw. It's bubbling near the sink, peeling at the front edge, and a melted crater where a hot pan rested for three seconds too long.
This is where most advice collapses the two categories into one verdict. A bathroom vanity that sees toothpaste and hand soap isn't the same environment as a 25-square-foot kitchen run that sits adjacent to a gas range. The material grade decision isn't about budget in isolation. It's about whether heat and water will find the adhesive within the first month.
Why Your Countertop Depth Changes Everything
US kitchen base cabinets are 24 inches deep. The countertop they support extends to a standard finished depth of 25 to 25.5 inches, with the extra inch to inch-and-a-half serving as a drip overhang.[2] That dimension matters because most peel-and-stick rolls come in widths of roughly 18, 24, or 26 inches. A 24-inch-wide roll will cover the flat surface of a standard counter but leave the front edge exposed, forcing you to either wrap the edge with a separate strip, creating a visible seam exactly where hands and cleaning cloths catch, or live with the original laminate peeking out.
Wider rolls, typically 26 inches and above, give you enough material to wrap the front edge and tuck a quarter-inch under the lip. That single detail is the difference between a surface that looks like a cover and one that reads as the counter itself. The real question isn't which pattern looks most like marble—it's whether your counter can survive Tuesday-night pasta. Seams near a sink or stove fail first because that's where water and heat concentrate. If your countertop is deeper than 25.5 inches, as some kitchen islands are at 27 to 30 inches, you'll need a seam regardless of which roll you choose. Place it in the least-trafficked zone, never directly in front of the sink or cooktop.
That understates it. A badly placed seam at the sink's front edge will lift within weeks as water pools in the microscopic gap and degrades the adhesive from the edge inward. This is the specific failure most first-timers don't see coming because installation videos film the finished surface, not month three.
Heat Tolerance, Water Resistance, and the Real-World Limits
Countertop-grade contact paper is vinyl, and vinyl deforms somewhere between 160°F and 200°F. Bob Vila's testing noted that d-c-fix, one of the more popular brands, holds up to 170°F before softening.[3] A pan straight off a medium-hot burner lands on the counter at roughly 200°F to 300°F depending on material and duration. The math is simple and unforgiving: direct contact from cookware will damage the surface every time.
The vinyl surface itself repels water, but the adhesive underneath does not. Water that reaches the adhesive layer through an unsealed sink edge, a lifted front corner, or a knife cut weakens the bond and starts the peel cycle.[3] Silicone caulk applied along the sink rim and front edge after installation slows this process considerably, but it doesn't eliminate the vulnerability.
The decision between countertop-grade contact paper and architectural vinyl film comes down to three variables most product pages won't highlight.
| Factor | Countertop-Grade Contact Paper | Architectural Vinyl Film |
|---|---|---|
| Typical thickness | 2-4 mils (0.05-0.1 mm) | 8-12 mils (0.2-0.3 mm) |
| Heat tolerance | ~150-175°F | ~180-200°F |
| Roll width options | 18, 24 inches common | 24, 26, 36 inches available |
| Repositions during install | Difficult; fast-grab adhesive | Air-release channels; repositionable |
| Cost per project | $20-$60 | $60-$150 |
| Typical lifespan (kitchen) | 1-2 years | 3-5 years |
The lifespan estimates assume you use trivets for hot items, cutting boards for food prep, and wipe up standing water promptly. Skip those habits and both materials fail faster, but contact paper fails faster by a wider margin because it has less material to sacrifice before the adhesive is exposed.
If you cook most nights and your countertop runs adjacent to the range, the recommendation shifts. The repeated radiant heat from cooking, even without direct pan contact, degrades contact paper's adhesive near the stove edge. In that scenario, architectural vinyl earns its price premium through longevity alone. But if your heaviest countertop use is a coffee maker and occasional toast, quality contact paper sealed around the sink edge will serve perfectly well for the duration of a typical lease.
The Installation Steps That Prevent the Three-Month Peel
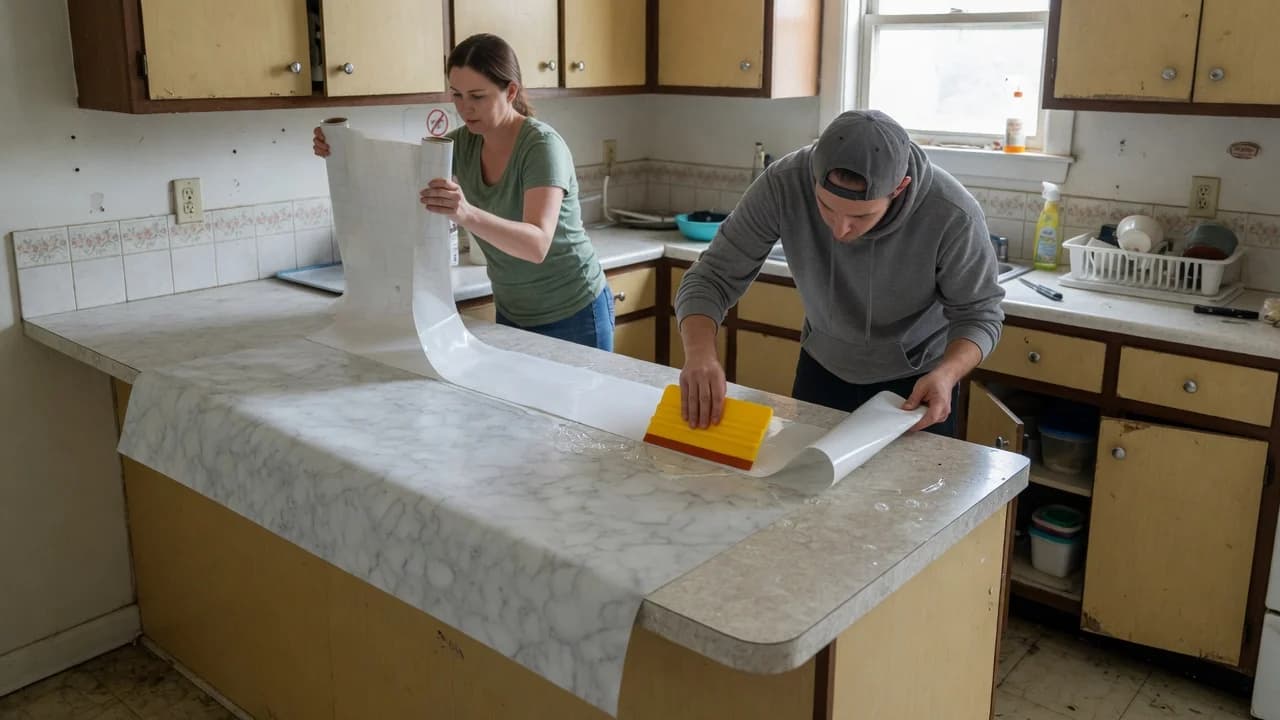
Clean the counter with a degreaser, not just surface spray. Any residual cooking oil or soap film creates a failure plane between the adhesive and the counter, and the film will lift from that spot within weeks. Spray the counter lightly with a mixture of water and a few drops of dish soap, or Windex, which several experienced DIYers recommend for the controlled slip it provides during positioning, then squeegee the liquid out from center to edges after laying the film. The small amount of remaining moisture evaporates without affecting adhesion.
Warm the vinyl with a hair dryer on low heat before wrapping corners and edges. Heat makes the material pliable enough to stretch over rounded front edges without creasing or cutting. After installation, run a thin bead of clear silicone caulk along the sink rim and the front lip. This is the step that separates a three-month surface from one that lasts through the lease, and most viral installation videos skip it entirely because caulk doesn't photograph well.
Removal, when the time comes, is straightforward if you installed correctly. Heat the surface with a hair dryer to soften the adhesive, peel slowly from a corner at a low angle, and clean any residual adhesive with rubbing alcohol or a citrus-based remover. The original laminate underneath should be untouched. Quality contact paper often protects the original surface from the staining and wear that would have occurred without it.
If your kitchen counter sits next to a stove and you cook with any regularity, buy architectural vinyl film in a roll wide enough to wrap the front edge, seal every seam with silicone caulk, and keep at least two trivets between your cookware and the surface at all times. The material cost will run $80 to $150 and the project will take an afternoon, but you won't be redoing it in eight months.
If your counter is in a bathroom, a laundry room, or a kitchen where the heaviest cooking involves a microwave and a coffee maker, countertop-grade contact paper from a reputable brand—d-c-fix, EZ Faux Decor, or equivalent—will hold up through a standard lease. Buy the wider roll, clean the substrate aggressively, and seal the sink edge.
If your existing countertop has a textured or heavily pitted surface, skip vinyl entirely. The texture will telegraph through any film under 10 mils thick, and the uneven adhesion creates air pockets that expand with humidity changes. A drop-in bamboo cutting board cut to size or a tempered-glass counter saver gives you a clean work surface without the adhesive risk.
Ignore the material's limits—place hot pans directly on the surface, let water pool at the sink edge, skip the edge sealing—and you'll be peeling melted vinyl off the original laminate within weeks. That conversation with your landlord is exactly what this project was supposed to prevent.